Happy 2015, I hope the year’s treating you well and you’re sewing up a storm!
I’ve completed a few projects already and although it’s soo last year, I’m still making jumpsuits and LOVING them!
I’ve made 11 in the last 18 months. #jumpsuitobsessed
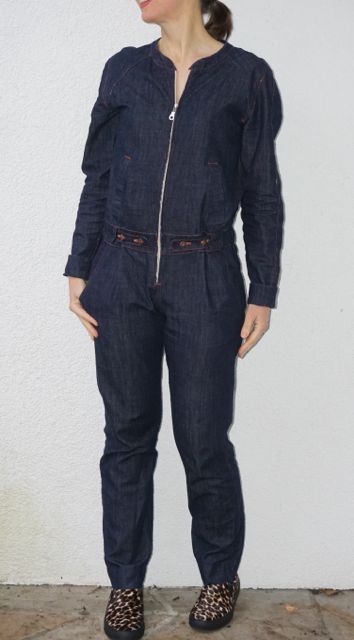
Here’s my latest denim one.
Love them or hate them, you can’t deny that jumpsuits give you all the fun of a dress in a ready-for-action form, and are comfortable and practical to wear.
So from all this jumpsuit-making action, here are my three tips for making a denim jumpsuit you’ll love.
1. Choose A Fabric That’s Easy To Move In.
A denim jumpsuit is a suit you should be able to jump for joy in, so when you’re choosing your fabric, do the ‘star-jump test’. If you can imagine star-jumping comfortably in it, then the fabric’s probably suitable. (This is an unofficial test obviously, strictly for YoSaMi followers only, LOL!)
To make a full length long sleeved jumpsuit like mine, I’d recommend using a lightweight shirt-weight denim. I used an organic 6oz cotton denim (98% cotton, 2% elastane) which has some drape to it and a little stretch and is soft and comfortable to wear. A regular jeans weight 12oz denim would be too heavy to wear all over and wouldn’t be so nimble in the ‘star-jump test’.
A linen twill or linen mix would also give you a ‘denim’ look and be comfortable to wear and be reasonably hard wearing.
2. Choose Practical and Functional Details.
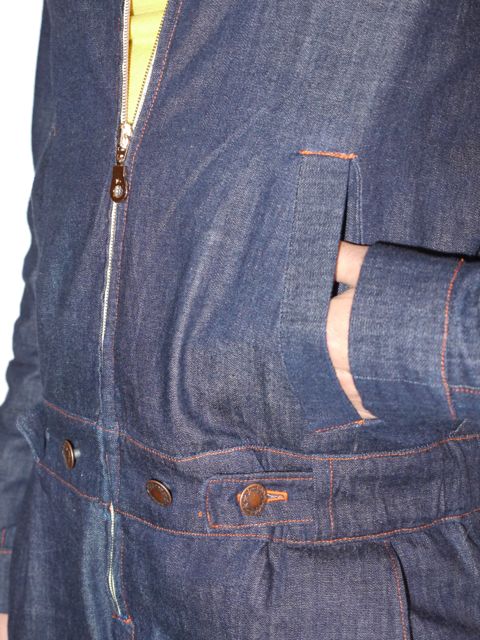
I’d recommend a front opening with a zip or buttons that extends down into the pants. I’ve found this is the easiest opening to get in and out of.
Adding elements such as zips, are also opportunities to soften and feminise the look of your jumpsuit and take it out of ‘boiler-suit’ territory. I used a gold zip for a bit of bling.
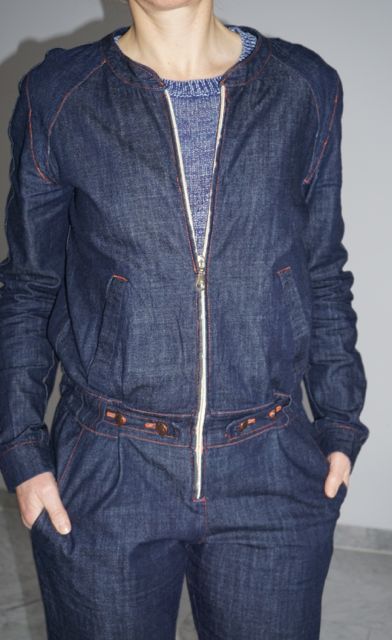
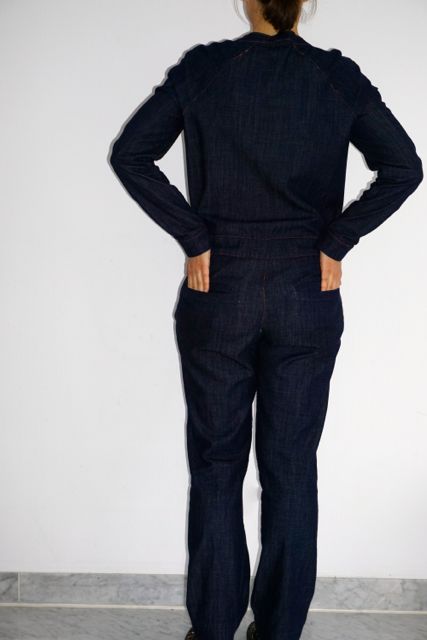
For the ultimate casual slouchy look, pockets for me are essential in a denim jumpsuit. This Burdastyle Easy S/S 14 jumpsuit pattern is packed with pockets. There are front welt pockets on the top and front pockets on the pants and back welt pockets on the pants.
The adjustable waist is also a winning feature of this jumpsuit and is relatively simple to do and a refreshing alternative to an elasticated waist. You could alternatively make a tie belt or finish the belt with a buckle or press studs.
3. Choose a Pattern With Options.
I recommend the Burdastyle Easy S/S 2014 jumpsuit pattern that I used because it offers lots of customising options, such as choice of pockets, sleeve and leg lengths, neckline finishes and waist fastenings. It’s useful to have the flexibility to remake it and alter the style to suit changing seasons. This pattern for instance has a cute sleeveless shorts version.
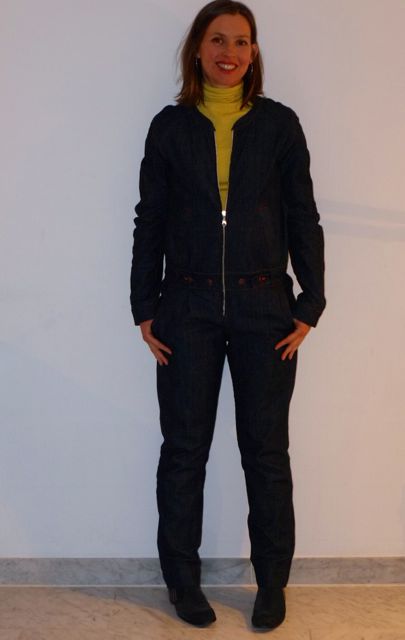
I’ve been wearing this long sleeved version layered up this winter, as you can see in the above photo. You can also make the pattern as a separate jacket and pants.
Alternatively you could experiment by putting a top pattern and a pants pattern that you like the style and fit of together and create a custom-made jumpsuit.

You can join the top section of the jumpsuit to the pants with a waistband as mine is. To do this, cut two rectangular pieces of fabric the length of the circumference of the waist section of your top and pants pieces, and the width you’d like your waistband to be, plus seam allowances.
Then with right sides facing, sew one piece of the waistband to the outer/right side of the pants. Turn the piece down and press the seam allowance towards the waistband. Then press the seam allowance of the waistband piece to the inside of the waistband and sew – hand stitch or stitch-in-the-ditch to the top. Repeat for the other waistband piece on the inner/wrong side of the top. Then hand stitch or stitch-in-the-ditch the waistband to the pants.
In my next jumpsuit pattern review, I’ll tell you how I made this tartan jumpsuit below. It’s a Simplicity pattern mash-up.

I hope these tips are helpful and if you’ve got any more I’d love to hear about them, so please leave a comment below.
If you enjoyed this post, sign up for email updates with the YoSaMi newsletter (they’re free!) by leaving your email in the box and clicking on the button at the top of the sidebar.
Happy sewing,
Christine
It really is a beautiful jumpsuit! And nice fringe I might add! Where have you been keeping yourself lately?
Thanks Brynn. Just been chillin’, how about you?
It is very very cool! I wish I had more opportunities to wear jumpsuits!
Thanks Kirsty, only just found this comment in the spam. You should give jumpsuits a go they’d look great on you!
I love your jumpsuits, I’ve been trying to make one myself but I have issues with the flap
Thank you and which flap are you having issues with?